eBike Comparison — DIY vs. What I Bought vs. The Competition
The Problem
I needed an e-bike for two things: commuting 8 miles to work and back (16 miles daily round trip), and occasionally carrying my 5-year-old. That second requirement changes everything — it's not just about getting yourself to work, it's about safely hauling a kid with enough power to handle hills and extra weight.
I spent weeks deep in Bafang mid-drive motor research. I evaluated five different base bikes. I mapped out motor options, battery specs, child-carrying setups, and drivetrain upgrades. I had the full build scoped, costed, and ready to execute.
Then I bought an Aipas M2 Pro direct from the manufacturer for under a grand.
Here's the full story — what the DIY path looked like, why I didn't take it, and whether I'd do it differently next time.
The DIY Path: Bafang Mid-Drive Conversion
A Bafang mid-drive conversion is the gold standard for DIY e-bike builds. You take an existing bike, remove the bottom bracket, install a motor unit, wire up a battery and display, and you've got a custom e-bike that you built yourself and can maintain forever.
Motor Selection
I landed on the Bafang BBS02 750W as the right motor for my use case. The BBS01 (250–350W) is too weak for hills with a child passenger. The BBSHD (1000W+) is overkill for daily commuting and harder on the drivetrain. The BBS02 hits the sweet spot — enough torque for loaded climbs, efficient enough for daily use, and widely supported with parts and programming tools.
Battery
The target was a 48V 17.5Ah or larger battery — enough for 35+ miles of range so I'm never stressing about a round trip. A 52V battery would give slightly more power and efficiency. Either way, it had to be removable so I could charge at work or bring it inside.
Base Bike Evaluation
This is where the project got interesting. I evaluated five different bikes as conversion candidates:
- 1996 Trek 6000 — My original candidate. Steel frame, standard threaded BSA bottom bracket, 26" wheels, rack and fender mounts. A genuinely solid frame for a conversion. The problem: it needed a new front fork, new pedals, a new derailleur, modern gear ratios, and new wheels and tires. The rehabilitation alone would run $460–950 before I even touched the motor kit.
- Nishiki Anasazi — Aluminum frame, decent condition. Compatible geometry but Nishiki quality varied by year and I couldn't verify the bottom bracket type from photos alone. The Trek was the stronger candidate.
- Highland Ridge (Steel, 26") — A Walmart/department store brand with a steel frame. Steel is forgiving and durable, but department store bikes sometimes use low-quality hi-ten steel. Hard to justify without hands-on inspection.
- Hogland Ridge (Steel) — Similar story. Promising on paper, but unverifiable quality without getting my hands on it.
- Specialized A1 Premium Aluminum — If I went aluminum, this was the tier to target. 6061 alloy, hydroformed tubes, reputable brand. These handle Bafang conversions well, though aluminum is less forgiving than steel under motor stress.
Child-Carrying Setup
For carrying a 5-year-old, the best options were a rear-mounted child seat (Thule Yepp Maxi is excellent with a 31.6mm seat post) or a cargo trailer for more versatility. The disc brakes question mattered here — extra weight from motor, battery, and child passenger means you need serious stopping power. The Trek's rim brakes would work with quality pads (Kool Stop or SwissStop), but disc brakes are objectively better for this use case.
The Ethical Angle
I believe refurbishing is an important ethical standard. Keeping a solid frame out of a landfill and giving it new life is the right thing to do. That conviction shaped my entire approach — I wasn't interested in buying some disposable department store bike as a throwaway platform.
Total DIY Build Cost Estimate
| Component | Low | High |
|---|---|---|
| Base bike rehabilitation | $460 | $950 |
| Bafang BBS02 kit | $400 | $525 |
| 48V 17.5Ah battery | $400 | $580 |
| Misc (tools, sensors, wiring) | $100 | $100 |
| Total | $1,360 | $2,155 |
And that's before a child seat ($100–150) or cargo trailer ($150–300).
Skills: Basic bicycle mechanics (removing a crankset, adjusting derailleurs), comfort with electrical connections, and willingness to learn Bafang controller programming.
Tools: Bottom bracket removal tool, crank puller, torque wrench, basic wrenches and allen keys. Possibly a chain tool and cable cutters.
Time: Realistically 15–25 hours spread across sourcing parts, prepping the bike, installation, programming, and shakedown rides.
Where to start: Find a steel or quality aluminum hardtail mountain bike from the late 90s to 2010s with a threaded BSA bottom bracket. Trek, Specialized, and Giant are safe bets. Then order a Bafang BBS02 kit and a 48V battery from a reputable supplier. The r/ebikes subreddit and Endless Sphere forums are your best research resources.
The Full Picture
DIY Bafang build vs. what I bought vs. the next-best option — specs, cost, and tradeoffs.
Xterrain
full control, learning
time-constrained, value
budget-first, solo riders
Aipas price includes free shipping, 1-yr warranty, no sales tax, and free rack bundle (bought direct). Jasion sale price per jasionbike.com.
A few things jump out of that table.
The DIY build is the most expensive option on paper — $1,060 to $1,625 before you even bolt it to a bike, and that's not counting the 15–25 hours of labor. But it's also the only option with a mid-drive motor, which uses the bike's gears for better hill climbing efficiency and a more natural ride. If terrain is your primary challenge, that matters.
The Jasion EB5 Roamer at $659 is a good budget option. It's a solid commuter bike with a surprisingly good lighting package — integrated turn signals are rare at any price point. But it tops out at 528Wh of battery, runs standard 1.95" tires, handles only 330 lbs, and has front-only suspension. For solo commuting on flat-to-moderate terrain, it's likely a great value. For hauling a youngin' up hills with groceries on the rack, I thought it to be underpowered and underspecced.
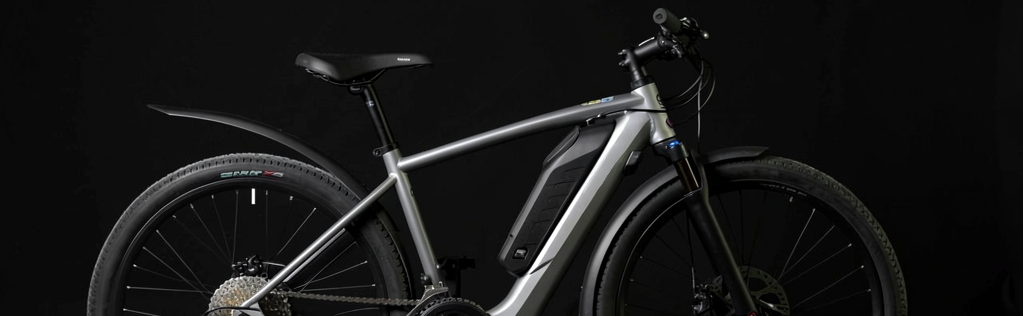
The Aipas M2 Pro splits the difference. It's $290 more than the Jasion but gives you 60% more battery capacity, full suspension, fat tires for stability, 500 lbs of weight capacity, and nearly triple the torque. It's less than the DIY build in every scenario, and you're riding in a day instead of spending weekends in the garage.
Why I Bought It
Three factors tipped the decision, in order of weight:
Time. I had the knowledge, the plan, and the capability. What I didn't have was the hours. Between work, my kid, and everything else on my plate, dedicating weekends to stripping a bottom bracket, programming a Bafang controller, and troubleshooting inevitable fitment issues didn't fit what I had identified my use case to be: having a bike for commuting, not another project that would eventually be a commuter. Once I separated the means from the end, the decision got simple.
Cost math that actually favored buying. My conservative DIY estimate was $1,360 before a child seat — and that assumed a base bike that needed minimal rehab, which the Trek 6000 absolutely did not. Realistically, I was looking at $1,500–2,000 all-in. The Aipas was $949 direct from the manufacturer with free shipping, a 1-year warranty, no sales tax, and a free front and rear rack bundle. Even the "cheap" DIY path costs more than the pre-built option that comes with a warranty.
Safety certification. UL 2849 (bike) and UL 2271 (battery) mean the electrical system has been independently tested. DIY battery packs can be safe — the community has deep knowledge here — but they can also be house fires. With a child on the back, that's not a risk I was willing to absorb for the sake of doing it myself.
6 Months In
Off the rip, space is a big concern for a full frame mountain eBike. I never assumed it would fit in my one bay detached garage that has a vehicle already parked in it. That being said, one aspect that I didn't fully appreciate until I had it sitting, fully put together in my entryway: how absolutely massive a full frame mountain eBike is. The Aipas is 80 inches long, 52-inch wheelbase, and weighs 90 lbs with the battery. This thing has a footprint. Do I regret this in application? No — the mass plus the full suspension plus the fat tires means that the Aipas soaks up the bumps and divots. But if you're working with a studio apartment or a shared hallway, measure first.
This is more of a reality of batteries and temperature than it is a critique of the Aipas. Once the weather was getting sub 45 degrees Fahrenheit I realized that my battery would be more than half dead on my roughly 8 mile ride into work while maintaining a 20+ MPH pace. On one of these occasions I had my battery completely drained a tenth of a mile away from home. I realized then that riding an eBike with a hub motor without juice is akin to riding a workout bike at a high setting at the gym. It is not easy. And this is actually one area where the DIY mid-drive path would have an advantage — a Bafang BBS02 without battery power still pedals like a normal (heavy) bike because it works through the gears. A hub motor without juice means you're fighting the motor's internal resistance with every pedal stroke. The lesson learned here is to get to know your routes, understand how your bike will perform at various distances and rates of travel and when in doubt, bring your charger.
Other than those general items, I've enjoyed riding my eBike to work and knocking out part of my exercise during my commute and only adding roughly 20 minutes over driving.
Would I DIY It?
Do I want to DIY it? Yes. Will I DIY one in the future? Maybe. I'd certainly need some more storage space before justifying the project.
What DIY would have given me that the Aipas doesn't
A mid-drive motor. The Bafang BBS02 uses the bike's existing gears, which means better hill climbing efficiency and a more natural ride feel. The Aipas uses a rear hub motor — simpler but less efficient on steep terrain. For my current commute (relatively flat), this doesn't matter much. For the homestead property I'm planning in western Virginia, it would.
A bike I know inside and out. When something breaks on a DIY build, you know every wire, every connection, every component because you put it there. The Aipas is a black box by comparison — and the mechanical disc brakes, while functional, have been flagged in reviews for longer stopping distances at speed. Hydraulic brakes would be a valuable upgrade, and that's the kind of mod that's straightforward on a DIY build but awkward on a pre-built.
The refurbishment ethic. I still feel this one. The Trek 6000 deserved a second life, and buying a mass-produced e-bike doesn't scratch that itch.
What the Aipas gave me that DIY wouldn't have
Immediate utility. I was riding within a day of delivery. A DIY build would have been weeks of evenings and weekends.
Full suspension. Building a full-suspension e-bike from a conversion kit is significantly more complex and expensive than a hardtail build. The Aipas came with it stock — 100mm front fork travel plus a rear shock absorber.
Under $1,000 all-in. My conservative DIY estimate was $1,360 before a child seat. The Aipas was $949 with free shipping, a 1-year warranty, no sales tax, and free racks.
Bottom line: If I had the time, a solid donor bike ready to go, and a shop to work in, I'd still want to do a Bafang build. For the commuting problem I needed solved now, buying was the right call, and the Aipas ticked the right boxes for the problem I was solving.
Knowledge Value Assessment
Here's what surprised me about this project: I learned more from the research I didn't use than from the purchase I made.
Weeks of Bafang research taught me how mid-drive motors interact with existing drivetrains, why bottom bracket standards matter, how battery chemistry affects range and safety, and what separates a quality frame from a landfill candidate. That knowledge doesn't expire because I bought a pre-built bike and it made me a better evaluator of the Aipas — I understood exactly what I was trading away (mid-drive efficiency, repairability, the refurb ethic) and what I was getting (time, safety certification, cost savings).
The DIY research also made me a more informed owner. I know the Aipas's rear hub motor will be less efficient on steep grades. I know the mechanical brakes are the weakest link. I know the 7-speed Shimano drivetrain is entry-level. None of that was a surprise because I'd already evaluated these components in the context of a build.
If you're reading this and thinking about skipping the research because you're going to buy anyway — don't. The research is the value, whether or not you end up building.
Sources & References
- Bafang BBS02 750W specifications and pricing — Luna Cycle ($525 motor kit), Electrify Bike ($499 on sale), Ebike Essentials ($1,199 complete kit with battery)
- Aipas M2 Pro Xterrain product page and specifications — aipasbike.com ($949) · also on Amazon
- Jasion EB5 Roamer product page and specifications — jasionbike.com ($659)
- Aipas M2 Pro real-world review — Electric Bike Report (September 2025)
- Aipas M2 Pro detailed review — Go Ebike Life (October 2025)
- Aipas M2 Pro review — Scott Hardesty (August 2025)
- Jasion EB5 Roamer review — Go Ebike Life (November 2025)
- 48V 17.5Ah battery pricing — Ebike Essentials, California Ebike, Ebike Marketplace ($400–580 range)
- r/ebikes community research
- Endless Sphere forums for Bafang conversion guidance
Some links in this post are affiliate links. If you buy through them, I earn a small commission at no extra cost to you. I only link to products I've researched, used, or genuinely recommend. Affiliate relationships never influence scores or recommendations.
Get the next build in your inbox
New projects, teardowns, and decision frameworks — every 2–3 weeks.